


DIY Pumpkin Succulent Planter: A Fall Centerpiece That Keeps Growing

Every fall I want a pumpkin on the table, and every fall I feel a little guilty when that pumpkin turns into a soggy mess on the porch two weeks later. A few years ago I found the fix: skip the carving and turn the pumpkin into a living planter. You glue moss on top, tuck in a crown of succulent cuttings, and you get a centerpiece that looks great from early October right through Thanksgiving. Best part, when the pumpkin is finally done, the succulents are not. Most of them will have started rooting, and you can plant them out and keep growing them for years.
This is one of my favorite crafts because it uses stuff most desert gardeners already have. If you have a few overgrown echeverias or a sedum spilling out of its pot, you already have half your supplies.
Why You Do Not Carve This Pumpkin
The biggest secret to this project is leaving the pumpkin whole. A carved pumpkin starts breaking down almost immediately, because you have opened up the moist flesh to air and mold. In Arizona heat, that can mean a few days before it slumps. An uncut pumpkin, on the other hand, can last for weeks or even a couple of months indoors if it is kept cool and dry.
So my main version does not hollow anything out. (My cactus buddy in the comic below goes the scoop-and-fill route, which is fun for a quick porch display, but a soil-filled pumpkin usually lasts only a week or two in our heat.) The succulents sit on top, glued to a layer of moss. They do not need soil to stay alive for a few months. A cutting has enough stored water to sit happily on moss, and many will start pushing out tiny roots looking for something to grab.
Materials List
Here is what I gather before I start:
- One pumpkin with a fairly flat top and a sturdy stem. Flat, squat varieties like Cinderella (Rouge vif d'Etampes), Jarrahdale (the blue-gray one), Fairytale, or a white Lumina are perfect because they give you a wide platform.
- Sheet moss or Spanish moss. Sheet moss gives a tidier look and stays put better.
- Glue: tacky craft glue, floral adhesive, or a low-temp glue gun. Spray adhesive also works for attaching the moss.
- Succulent cuttings in a mix of sizes, shapes, and colors (more on this below).
- Accents (optional): mini pinecones, dried seed pods, acorns, small gourds, a sprig of dried wheat, air plants, or a bit of ribbon.
- Tools: clean scissors or pruners, a paper towel, and a little diluted bleach or white vinegar for wiping the pumpkin.
- A plate or charger to set the finished pumpkin on, so moisture never touches your table.
If you need moss or floral glue, here are a couple of easy options: https://www.amazon.com/s?k=preserved+sheet+moss&tag=greenthumbh0a-20 and https://www.amazon.com/s?k=floral+adhesive+glue&tag=greenthumbh0a-20
Picking Your Succulents
This is where it gets fun. I think of the arrangement like a bouquet, so I want a few "star" pieces, some medium filler, and something that spills over the side.
- Stars: echeveria rosettes are the classic. Their open, flower-like shape is the focal point. Graptoveria and larger sempervivum (hens and chicks) also shine.
- Fillers: sedum (like Jelly Bean or Burro's Tail bits), small crassula, graptopetalum, kalanchoe, and little aeonium rosettes.
- Spillers: string of pearls, string of bananas, or trailing sedum. These drape down the side of the pumpkin and make it look lush.
Colors matter too. Fall pumpkins look gorgeous with dusty blue and purple echeveria, red-tipped sedum, and chartreuse fillers. On a white pumpkin, deep burgundy succulents really pop.
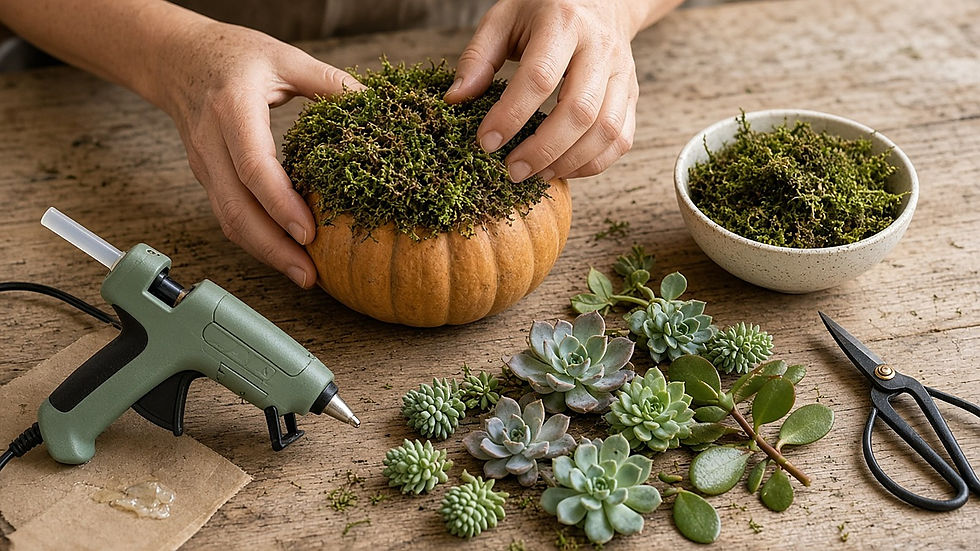
You can buy cuttings, but I usually take them from my own plants. Snip rosettes with an inch or so of stem, and pull leaves off the bottom of the stem so you have a clean end. Then set the cuttings out on a paper towel in a shaded spot for two to three days to let the cut ends callus. That dry, sealed end resists rot and is ready to root later.
Step-by-Step: Building the Pumpkin Planter
Step 1: Clean the pumpkin. Wipe the whole pumpkin with a damp paper towel and a little diluted bleach (about one tablespoon per quart of water) or white vinegar. This knocks back mold spores and helps it last longer. Let it dry completely.
Step 2: Check for soft spots. Press gently all around. Any soft, bruised, or leaking area means that pumpkin will not last. Pick another.
Step 3: Glue the moss. Spread glue in a circle on the top of the pumpkin, around the stem. Make the circle about as wide as you want your arrangement. Press the sheet moss onto the glue, trimming it into a rough round shape. A layer about a half inch thick is perfect. Some people like to leave the stem poking up through the middle; I think it looks charming.
Step 4: Place the star rosettes. Start with your biggest pieces. Put a dab of glue on the callused stem end and press it into the moss. I usually put my largest echeveria off-center, then add one or two other big rosettes in a rough triangle. Odd numbers tend to look more natural.
Step 5: Fill in. Work smaller succulents in around the stars, packing them closely so very little moss shows. Tilt some pieces outward toward the edges so the arrangement looks like a dome, not a flat lid.
Step 6: Add the spillers. Glue string of pearls or trailing sedum near the edge so the strands drape down the side of the pumpkin. One or two spillers on the front side is plenty.
Step 7: Tuck in accents. Mini pinecones, a dried pod, or an air plant add texture and that festive fall feel. Glue them in small gaps.
Step 8: Let it set. Give the glue a few hours to cure before moving the pumpkin. Then set it on a plate or charger and admire your work.
The whole thing takes about an hour, maybe a little more if you are as picky about placement as I am.

Caring for Your Pumpkin Planter
Care is very simple, but there are two big rules: keep the succulents a little happy and keep the pumpkin dry.
Light: Bright, indirect light is ideal. A table near a sunny window works great. If you put it outside, choose a shaded spot. In early fall here, a porch in direct afternoon sun can still hit the 90s, which will cook both the pumpkin and the cuttings.
Water: Mist the moss lightly once a week or so. You want the moss barely damp, not soaking. Water running down into the pumpkin is the fastest way to start rot. If the succulents start looking wrinkly, give them a slightly heavier misting.
Temperature: Cooler is better for the pumpkin. Indoors at room temperature is fine. Keep it away from heater vents and hot, sunny glass.
Check it: Every few days, lift the pumpkin and look at the bottom. If you see a wet spot or feel it softening, it is time to wrap things up.
How Long Does It Last?
This is the question I get most. An uncut, well-cleaned pumpkin kept indoors in a cool spot can last anywhere from about four weeks to two or three months. Thick-skinned varieties tend to last longest. Outdoors in Arizona heat, expect it to be shorter, which is another reason I keep mine inside or in deep shade.
The succulents, meanwhile, can easily last several weeks on the moss, and many will grow roots into it. That is why I like to make mine in early October. It covers Halloween as a pumpkin display and Thanksgiving as a centerpiece without a swap.
If you want something that lasts forever, you can do the exact same technique on a faux pumpkin. You will lose the compost-at-the-end bonus, but you can refresh the succulents each year.
Replanting the Succulents Afterward
When the pumpkin starts to soften, the fun part begins. Gently pull the succulents off the moss. A lot of them will have little white roots, and some might have even grown into the moss. That is a great sign.
Here is how I replant them:
1. Fill a shallow pot or tray with a gritty cactus and succulent mix. I like to add extra pumice or perlite for drainage.
2. Peel any glue off the stems, or snip off the glued tip if the stem is long enough.
3. Set each cutting on top of the soil or tuck the stem in slightly. Pieces with roots can go a little deeper.
4. Keep the pot in bright shade and water lightly when the soil is dry. Once you see new growth, you know they have rooted.
5. Gradually move them into more sun over a couple of weeks.
Fall and early winter are wonderful times to root succulents here in the low desert. The temperatures are gentle, and the plants are growing actively. Just watch for frost on the coldest nights and bring tender ones in.
String of pearls cuttings can be laid on the soil surface, and they will root wherever the strands touch the dirt. Within a few months, you will have a whole new collection, or a gift pot for a friend.
Do Not Forget the Pumpkin
Once the planter is done, the pumpkin still has one last job. Chop it up and toss it in the compost pile, or bury it in a garden bed to break down. If you have chickens, they will happily take care of it for you. Cut it into chunks first so it breaks down faster.
If the pumpkin was a good eating variety and still firm when you took it apart, you can even save the seeds for next year's garden.
Tips for Success
- Make it a week or two after you buy the pumpkin, once you know it is solid.
- Use callused cuttings only. Fresh, wet stem ends are more likely to rot.
- Do not overload with glue. A dab is enough.
- Group colors in clusters instead of scattering them evenly. It looks more intentional.
- Kids love this project. Let them pick the accents and place the small fillers.
A Craft That Keeps on Growing
I love projects that do not end in the trash. This pumpkin succulent planter gives you a gorgeous fall centerpiece, a few months of easy decor, and a tray of new succulents at the end. Every year my collection grows a little more because of it.
So the next time you are at the pumpkin patch, grab a flat-topped one and walk out to your succulents with a pair of snips. Your fall table will thank you, and so will your garden.


Comments